Hello everybody!!!
For today i have a bit of bind. Bind is a name services, is the most used but exists any more like djbdns, NSD, PowerDNS, etc… First we have to understand the DNS is a big distributed and hierarchical database that transforms a name to IP or a IP to name. In this picture you’ll see this hierarchy:
In the first level there are the root servers, this servers knows the autorized name servers of each zones of internet. Under the root servers have the top level domains (TLD) are organizated by geography (.ie,.es,.uk,…) or generic uses (.com,.net,…). And the second level is the name of the organization like google, debian, fsf,… and this names are registered by an entity autorithed by the ICANN.
In this tutorial i’ll show how to install and configure a small zone with a master and slave replication, and configure one delegation of subdomain to another server. In the next entry we’ll ensure our environment with a chroot service and sign the zones with dnssec.
I use the bind software, exactly the version 9.7.0 running in a Centos 6.0. the network scenario is:
1- Master server of the domain mydomain.com with IP: 192.168.1.34
2- Slave server of the domain mydomain.com with IP: 192.168.1.36
3- Sub domain server of the domain subdomain.mydomain.com with IP: 192.168.1.37
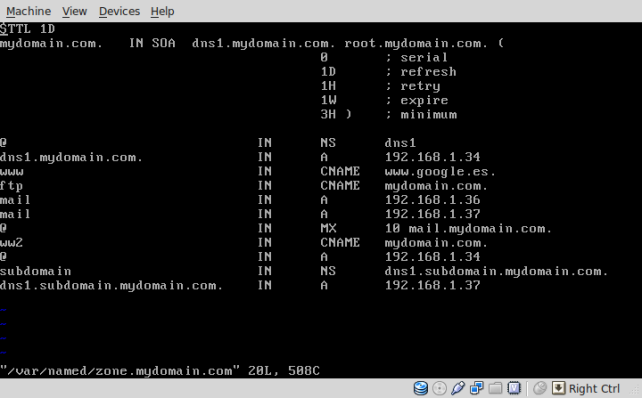
bind use the /etc/named.conf for global configuration of the named service and the statement of the zones. Normally in /var/named saves the files that contains the definition of the zones. The records that i used for this tutorial for configure my zones are:
– A (host): transform a name to IP.
– CNAME: cannonical name, is an alias for a host.
– NS: the name server for the domain.
– MX : defines a mail exchanger for the domain.
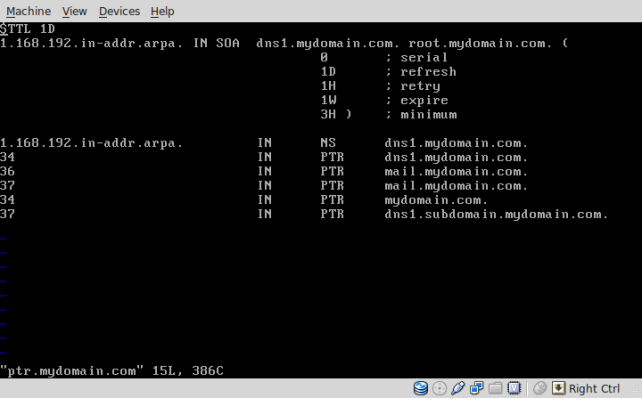
– PTR : for reverse DNS lookups, transform a IP to name.
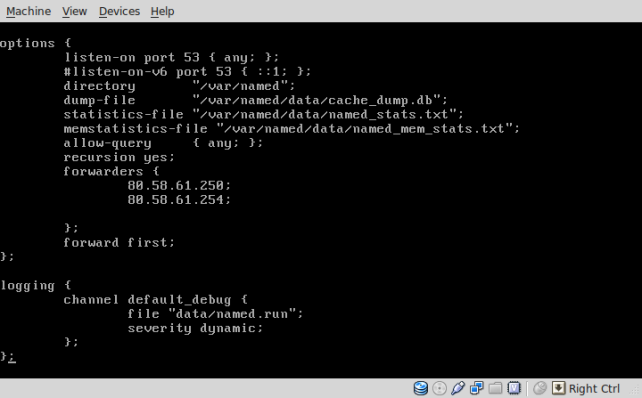
Basically the file /etc/named.conf is divided in two parts:
- option section:
– listen-on port 53: you can configure the port and the IP that the service listens.
– directory: default directory for the definitions of the zones.
– allow-query: allow answer queries from the an IP or ranges or any for everybody.
– forwarders: if the DNS service can’t answer a query from his files zones, ask the query for the forwarders servers.
– forward (first | only): first forward first, else after look his files zones. the option only is for forward all the queries to the forwarders. - zone section:
– type: the role of the server (master, slave or hint).
– file: the file of the zone definition.
– allow-transfer : the ip of the slave server.
– also-notify: when the files of the zones changes it allows to notify to the slave server.
– allow-notify: the ip of the master server to allow notifies.
Well, start working!!
Master, slave and sub domain servers
1.- Install the bind software and more utilities:
#yum -y install bind bind-utils
2.- configure to run the service automatically when the server starts.
#chkconfig --level 2345 named on
3.- Configure to stop the service automatically when the server halts.
#chkconfig --level 016 named off
Slave and sub domain servers
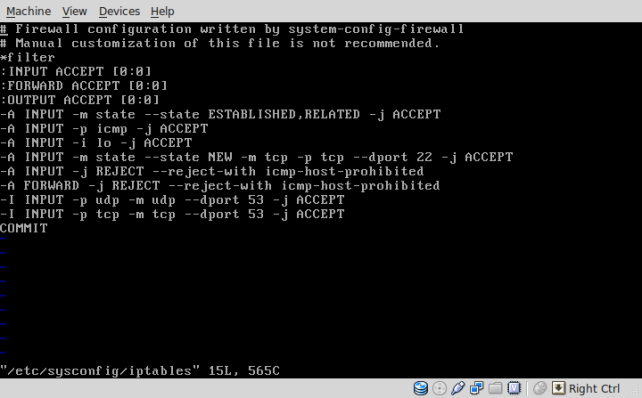
1.- Edit /etc/sysconfig/iptables to add two rules for accept TCP and UDP traffic from the port number 53:
-I INPUT -p udp -m udp --dport 53 -j ACCEPT
-I INPUT -p tcp -m tcp --dport 53 -j ACCEPT
2.- restart the iptables service for enable the new rules:
#service iptables restart
Master server
1.- Edit /etc/sysconfig/iptables to add 4 rules, 2 for accept TCP and UDP traffic from port number 53 and 2 more for input and output traffic to allow the traffic for transfer the zones from the master server:
-I INPUT -p udp -m udp --dport 53 -j ACCEPT
-I INPUT -p tcp -m tcp --dport 53 -j ACCEPT
-I INPUT -p tcp --sport 1024:65535 --dport 53 -m state --state NEW,ESTABLISHED -j ACCEPT
-I OUTPUT -p tcp --sport 53 --dport 1024:65535 -m state --state ESTABLISHED -j ACCEPT
2.- restart iptables services
#service iptables restart
3.- edit the config file /etc/named.conf:
4.- Now we’ll copy an empty definition of a zone and edit it:
#cp /var/named/named.empty /var/named/zone.mydomain.com
5.- edit /var/named/zone.mydomain.com:
6.- we’ll configure the reverse zone:
#cp /var/named/named.empty /var/named/ptr.mydomain.com
7.- edit /var/named/ptr.mydomain.com:
8.- change the owner of the files and directories to the user and group named:
#chown -R named:named /var/named/
9.- restart the named service for the new entries:
#service named restart
Slave server
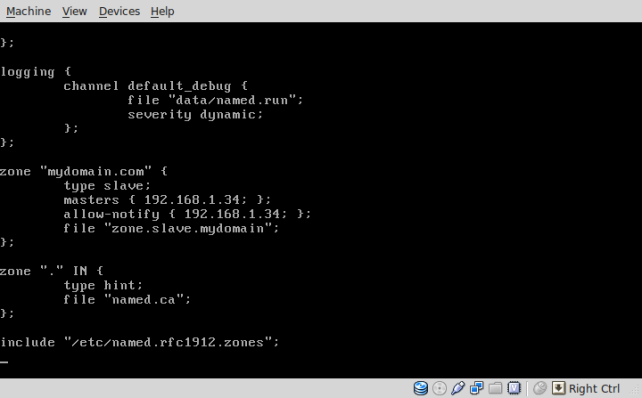
1.- edit config file /etc/named.conf
2.- change the owner:
#chown -R named:named /var/named/
3.- restart the named service:
#service named restart
Sub domain server
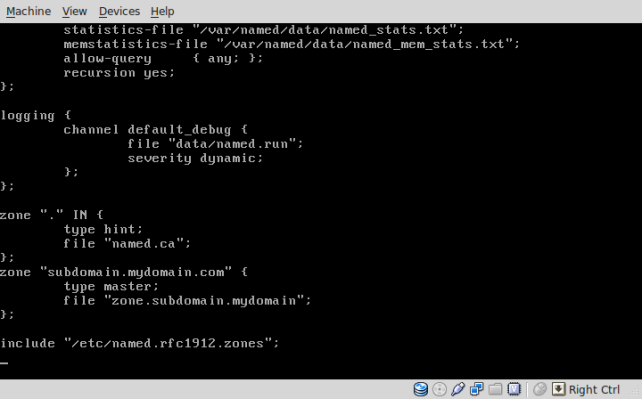
1.- edit config file /etc/named.conf:
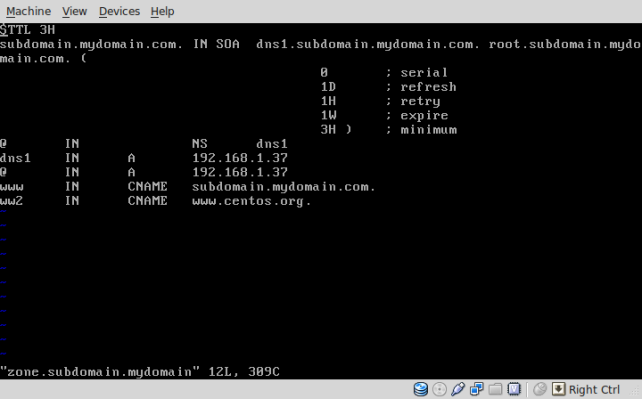
2.- configure and edit the zones:
#cp /var/named/named.empty /var/named/zone.subdomain.mydomain
#vi /var/named/zone.subdomain.mydomain
4.- change the owner:
#chown -R named:named /var/named/
5.- restart the named service:
#service named restart
Tests
1.- Change the resolvers of a client and put the master and slave servers IP to the /etc/resolv.conf:
#echo "nameserver 192.168.1.34 nameserver 192.168.1.36" > /etc/resolv.conf
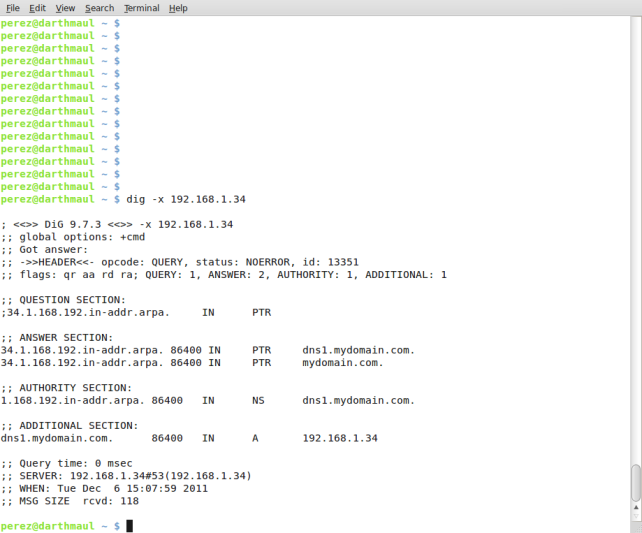
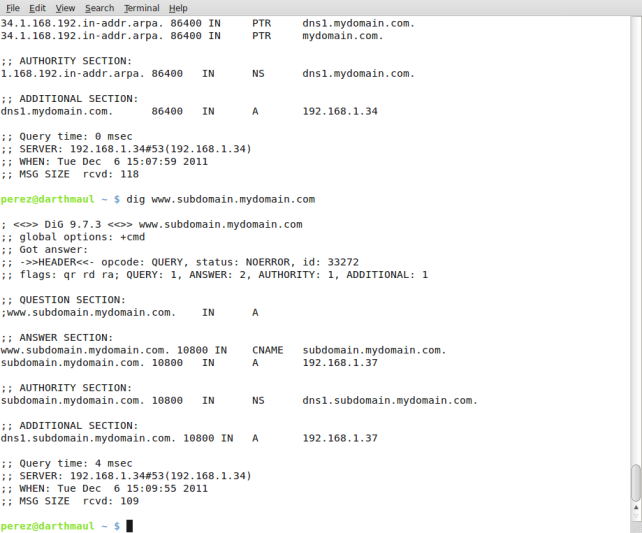
2.- checking the PTR records:
dig -x 192.168.1.34
3.- checking the subdomain:
dig www.subdomain.mydomain.com
4.- In the file /var/named/data/named.run saves a log of the function of bind, in this picture can see i make a change on the master server and notify to the slave server to change his file zone:
And that’s it!! More in the next entry!! bye bye!!


